> ## Documentation Index
> Fetch the complete documentation index at: https://docs.weeziq.com/docs/llms.txt
> Use this file to discover all available pages before exploring further.
# WooCommerce Integration
> Connect your WooCommerce store to WeezIQ in minutes using the official WordPress plugin. Automatic product sync, order lookup, coupon distribution, and live chatbot — no code required.
WeezIQ connects directly to your WooCommerce store through an official WordPress plugin. Once installed, a single click authorizes your store, syncs all your products, coupons, and pages into your chatbot's knowledge base, and automatically embeds the chat widget on your storefront.
## Prerequisites
An active WeezIQ account with at least one domain created.
A WordPress site with WooCommerce installed and active (WooCommerce 7.0+ required).
You need admin or shop manager access to install plugins and manage settings.
WooCommerce integration is available on the **Starter**, **Growth**, and **Pro** plans. The number of products synced depends on your plan.
***
## Setup Guide
You can [download the plugin file](https://blog.weeziq.com/wp-content/uploads/2026/03/weeziq-ai-chatbot.zip) and upload it via **Plugins → Upload Plugin**.
Once activated, you will see a new **WeezIQ AI** menu item under **WooCommerce** in your WordPress admin sidebar.
You will also see an admin notice at the top of your screen reminding you to complete setup. You can click **Go to Settings →** directly from there.
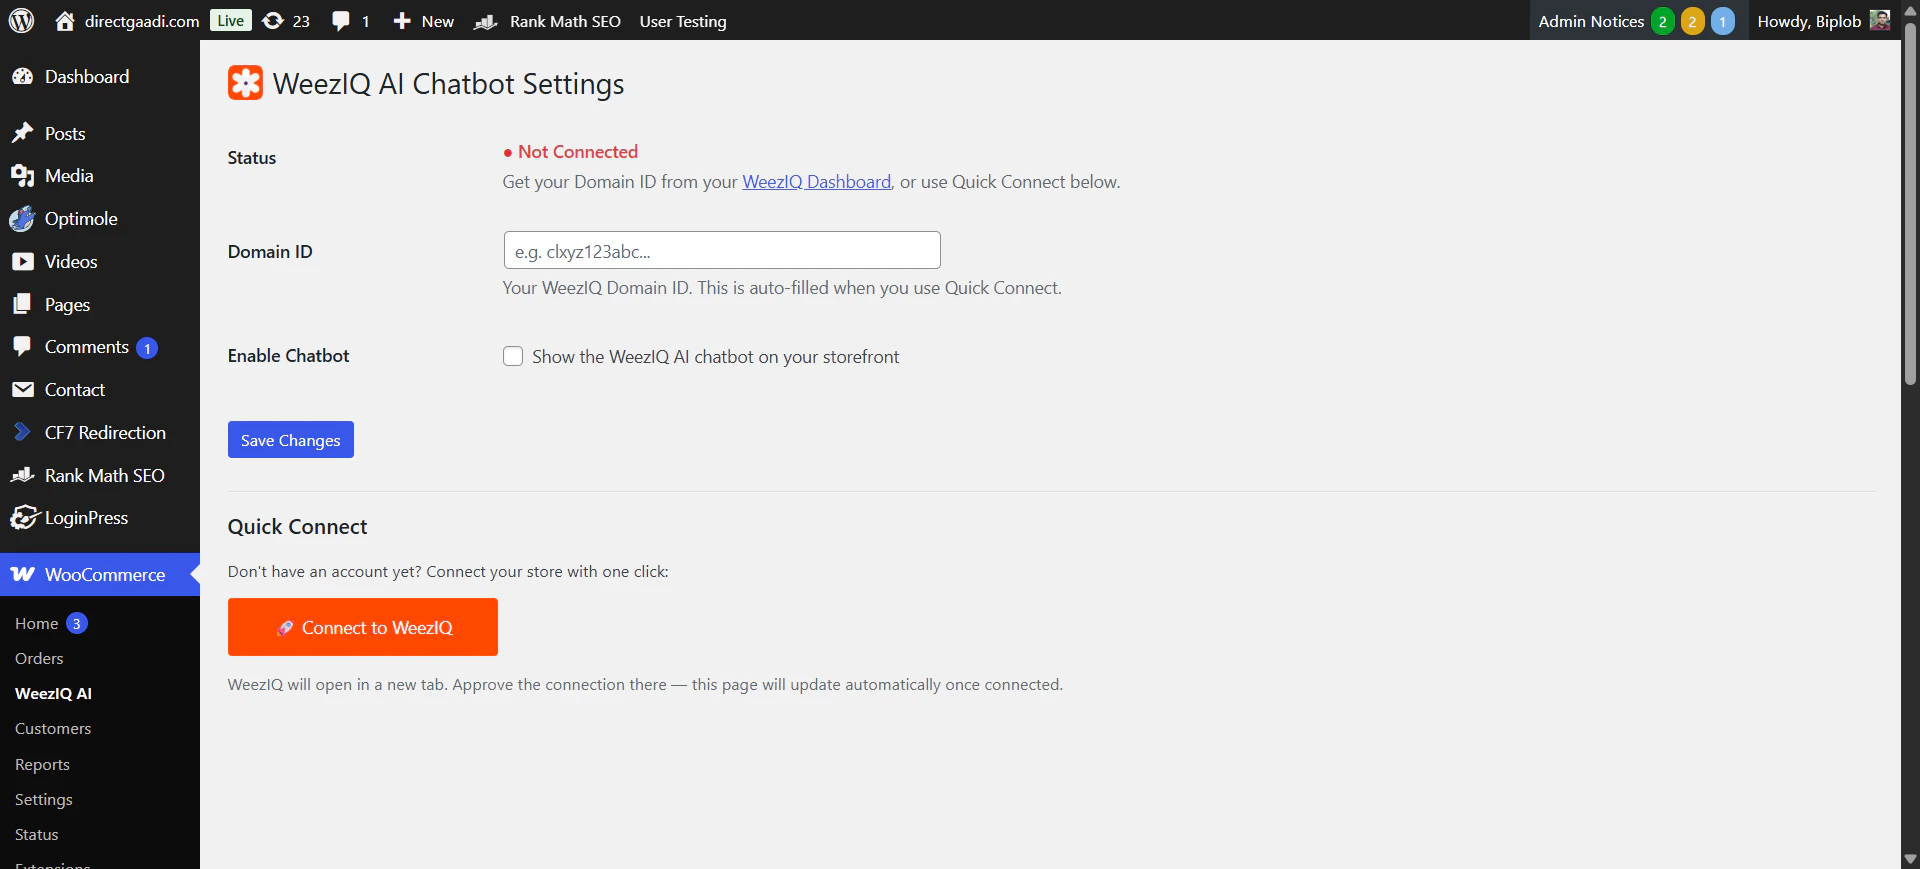 Navigate to **WooCommerce → WeezIQ AI** in your WordPress admin.
You will see the plugin settings page with a **Status** row showing **Not Connected** in red.
Scroll down to the **Quick Connect** section and click the large **Connect to WeezIQ** button.
This opens the WeezIQ authorization page in a **new browser tab**. The plugin page stays open in your original tab and immediately begins listening for a successful connection.
Do not close the WordPress tab after clicking Connect. It polls in the background every 3 seconds and will automatically refresh once the connection is confirmed.
Navigate to **WooCommerce → WeezIQ AI** in your WordPress admin.
You will see the plugin settings page with a **Status** row showing **Not Connected** in red.
Scroll down to the **Quick Connect** section and click the large **Connect to WeezIQ** button.
This opens the WeezIQ authorization page in a **new browser tab**. The plugin page stays open in your original tab and immediately begins listening for a successful connection.
Do not close the WordPress tab after clicking Connect. It polls in the background every 3 seconds and will automatically refresh once the connection is confirmed.
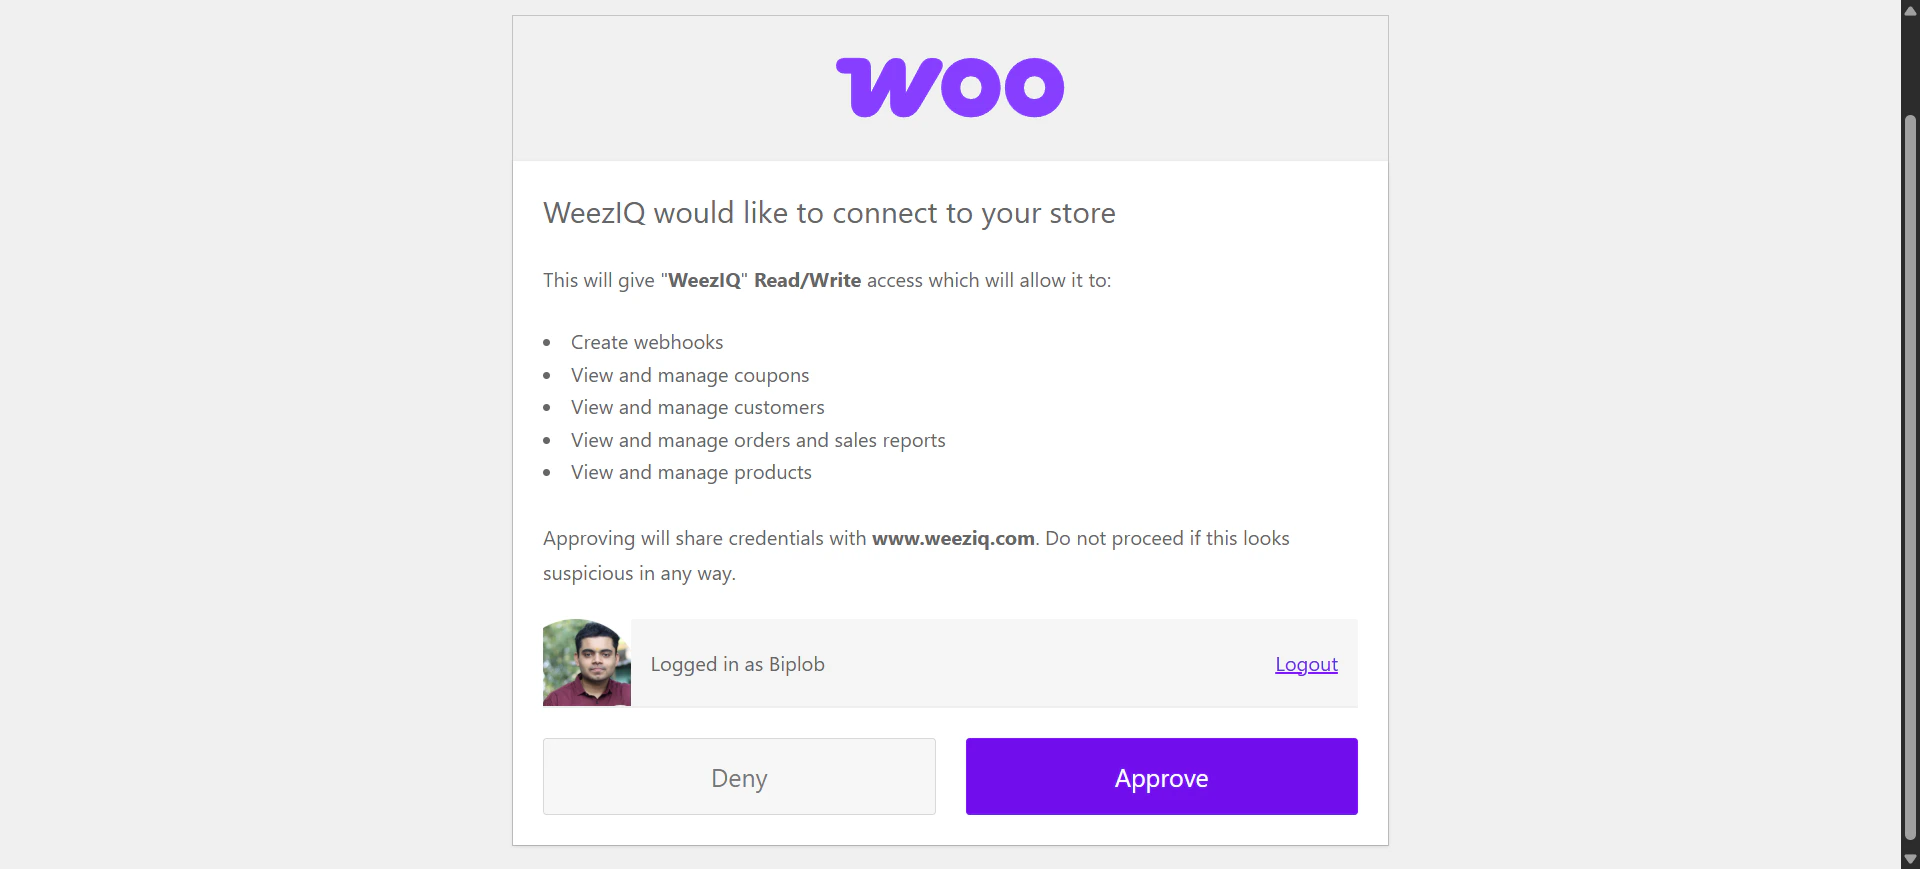 In the new tab that opens, you will land on the WeezIQ WooCommerce connection page. Your store URL is automatically passed along — you do not need to enter it manually.
From here:
* Log in to your WeezIQ account (or create one if you don't have one yet).
* Select which WeezIQ domain you want to link to this WooCommerce store.
* Approve the connection.
WeezIQ will generate the secure API credentials and store them encrypted on its end.
While you were on the WeezIQ tab, the plugin in your WordPress admin was polling WeezIQ every 3 seconds for connection status.
The moment your authorization is approved:
* The plugin receives confirmation and saves your WeezIQ **Domain ID** automatically.
* The chatbot is **enabled on your storefront** immediately — no extra toggle required.
* The WordPress settings page refreshes and the **Status** changes to **Connected** (shown with a green dot ●).
At the same time, WeezIQ begins automatically fetching all your store data in the background:
In the new tab that opens, you will land on the WeezIQ WooCommerce connection page. Your store URL is automatically passed along — you do not need to enter it manually.
From here:
* Log in to your WeezIQ account (or create one if you don't have one yet).
* Select which WeezIQ domain you want to link to this WooCommerce store.
* Approve the connection.
WeezIQ will generate the secure API credentials and store them encrypted on its end.
While you were on the WeezIQ tab, the plugin in your WordPress admin was polling WeezIQ every 3 seconds for connection status.
The moment your authorization is approved:
* The plugin receives confirmation and saves your WeezIQ **Domain ID** automatically.
* The chatbot is **enabled on your storefront** immediately — no extra toggle required.
* The WordPress settings page refreshes and the **Status** changes to **Connected** (shown with a green dot ●).
At the same time, WeezIQ begins automatically fetching all your store data in the background:
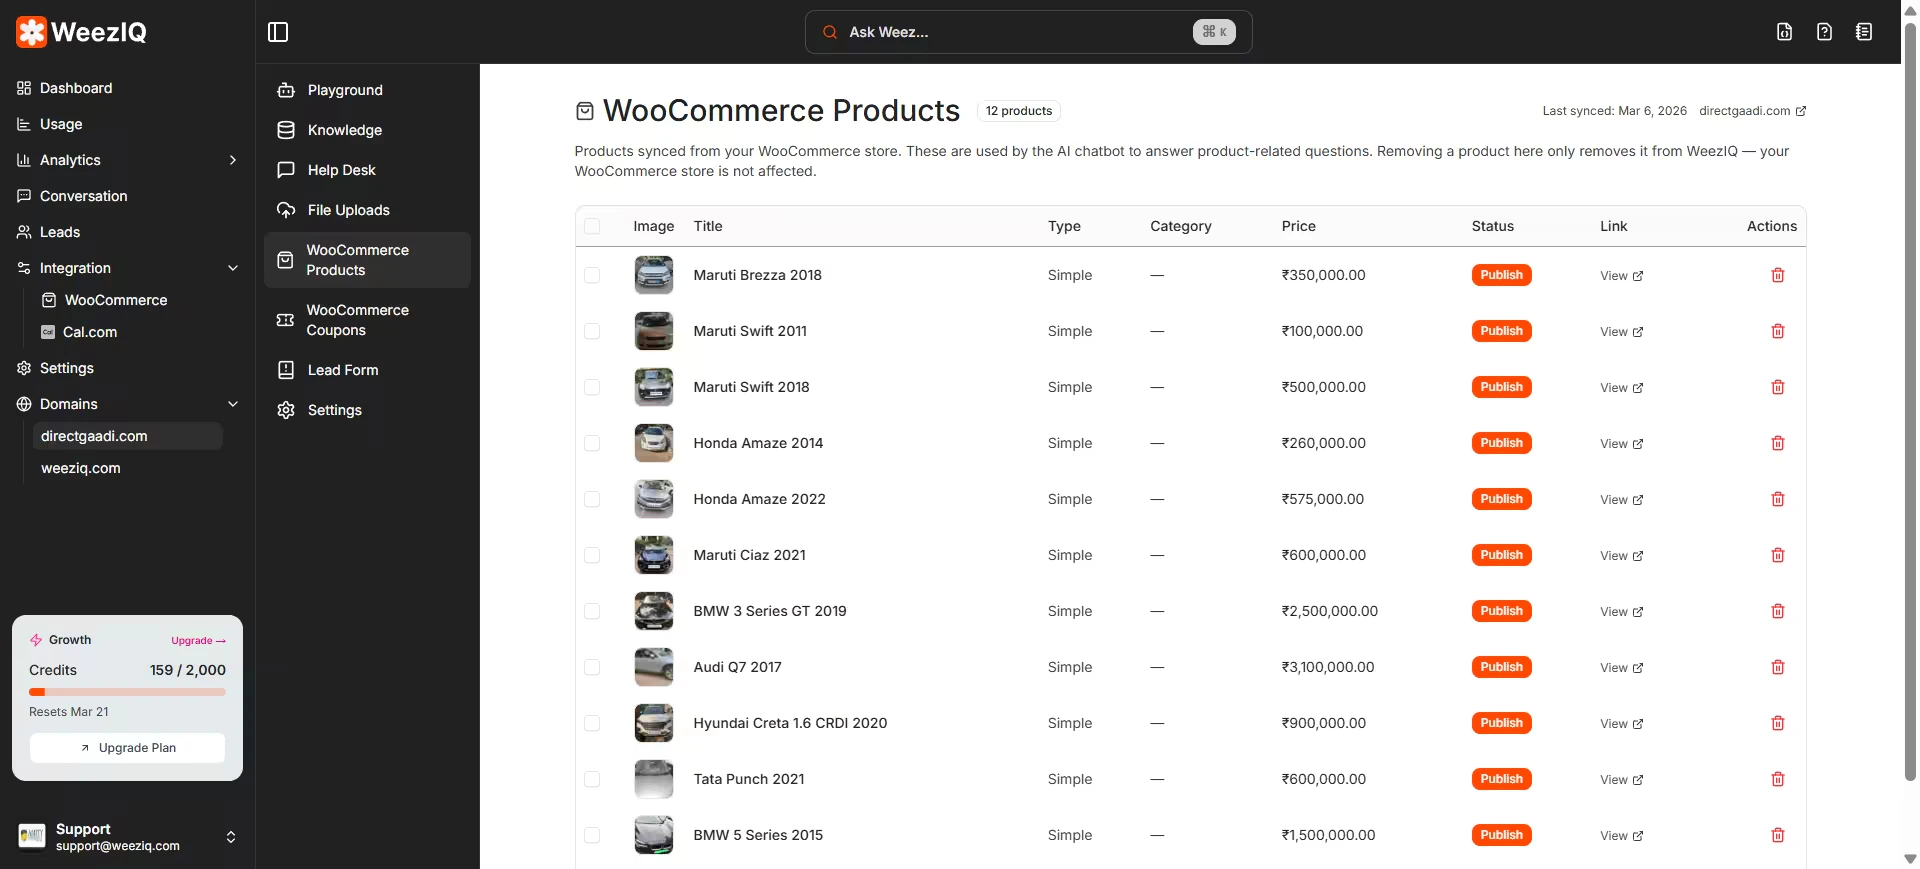 Titles, descriptions, prices, variants, images, categories, and tags.
Discount types, amounts, restrictions, expiry dates, and usage limits.
Your WordPress pages and posts — policies, FAQ, About Us, and more.
The number of products imported depends on your current WeezIQ plan. Your plan's limit is shown on the WooCommerce Dashboard inside WeezIQ.
That's it. The WeezIQ chat widget is now live on your WooCommerce storefront. Every visitor to your store will see the chat bubble powered by your real product data, store pages, and AI knowledge base.
The widget is injected automatically into every page of your store using a small script. No theme changes or code edits are needed.
***
## What the Chatbot Can Do on Your Store
Once connected, your chatbot is a fully capable WooCommerce assistant:
Visitors can ask "Do you have winter jackets under \$100?" and the chatbot searches your synced product catalog using AI, displaying matching results as interactive **Product Cards** with images, prices, and direct links to the product page.
Customers can ask "Where is my order?" and provide their order number or email. The chatbot retrieves real-time order status, payment status, line items, and tracking information directly from your WooCommerce store.
You can enable specific coupons for chatbot distribution from your WeezIQ dashboard. When enabled, the chatbot can offer discount codes during conversations. Expired or fully-redeemed coupons are blocked automatically.
The chat widget includes a built-in **Cart Overlay** — a mini browsing experience where customers can explore recommended products without leaving the conversation.
Because your WordPress pages (returns policy, shipping info, FAQ) are synced into the Knowledge Base, the chatbot can answer detailed policy questions accurately without routing users to a different page.
***
## Plugin Settings
After connecting, you can manage a few settings directly from **WooCommerce → WeezIQ AI**:
| Setting | Description |
| ------------------ | -------------------------------------------------------------------------------------------------- |
| **Status** | Shows whether your store is connected (green ●) or not (red ●). |
| **Domain ID** | Your WeezIQ Domain ID. Auto-filled on connection. You can also paste it manually if needed. |
| **Enable Chatbot** | A toggle to show or hide the chat widget on your storefront without disconnecting the integration. |
***
## Managing Your Integration from WeezIQ
Inside your WeezIQ account, navigate to **Integration → WooCommerce** to access the full management dashboard:
Manually trigger a full resync after bulk product changes or price updates.
Cancel an in-progress sync at any time.
Remove the WooCommerce connection and all synced data from WeezIQ.
The dashboard also shows a live count of synced products, orders, coupons, pages, and reviews — alongside your plan's limit for each.
***
## Real-Time Updates
After the initial sync, WeezIQ automatically registers **webhooks** with your WooCommerce store. These webhooks push real-time updates to WeezIQ whenever:
* A product is created, updated, or deleted
* An order is placed or its status changes
* A coupon is created, modified, or removed
All webhook payloads are verified using **HMAC-SHA256 signatures** to ensure they genuinely originate from your store.
For most stores, webhooks keep your chatbot's data current automatically. However, after large bulk operations (like importing 500+ products at once), it is good practice to trigger a manual resync from the WeezIQ dashboard.
***
## Dos and Don'ts
**Keep WordPress and WooCommerce updated.** The plugin is tested up to WooCommerce 10.5 and WordPress 6.9. Outdated versions may have REST API compatibility issues.
**Write clear product descriptions.** The AI uses your product titles and descriptions to answer customer questions. The more specific and complete your descriptions, the better the chatbot performs.
**Use the Enable toggle to temporarily hide the chatbot.** If you need to take the chatbot offline for maintenance, just uncheck **Enable Chatbot** in the plugin settings — the integration stays connected and your data is preserved.
**Check your plan limits.** Review how many products are synced vs. your plan's limit from the WooCommerce Dashboard in WeezIQ.
**Test after a resync.** After updating product data, ask the chatbot product-specific questions to confirm the new information is reflected correctly.
**Don't close the WordPress tab while connecting.** The plugin polls WeezIQ every 3 seconds to detect a successful connection. If you close that tab, the auto-detection won't fire and you'll need to enter the Domain ID manually.
**Don't disconnect and reconnect repeatedly.** Disconnecting removes all synced data from WeezIQ and triggers a full re-import from scratch, which counts against your plan's sync limits.
**Don't ignore sync errors.** If the sync status shows FAILED in WeezIQ, check that your WooCommerce REST API is accessible. Some security plugins or hosting configurations block external API requests.
**Don't enable too many coupons for distribution.** Be selective about which discount codes the chatbot is allowed to share to prevent unintended discount abuse.
**Don't rely only on webhooks for bulk changes.** For large catalog updates, always follow up with a manual resync to ensure all changes are captured.
***
## Troubleshooting
The plugin polls WeezIQ every 3 seconds. If it does not detect the connection after about 30 seconds, a "Still waiting…" message appears. This usually means the authorization was not completed in the WeezIQ tab.
Go back to the WeezIQ tab and confirm the connection. If the session expired, click **Connect to WeezIQ** again to restart the process.
You can also enter your **Domain ID** manually in the settings field and save.
Verify two things in the plugin settings:
1. The **Domain ID** field is not empty.
2. The **Enable Chatbot** checkbox is checked.
Save changes and reload a page on the front end. If the widget still does not appear, check that your WordPress theme is calling `wp_footer()` — some custom themes skip this function which prevents the widget script from loading.
Check that the sync completed successfully (status shows **COMPLETED** in WeezIQ). If it shows PENDING or FAILED, trigger a manual resync.
Also verify that the WooCommerce integration in WeezIQ is linked to the correct domain — the chatbot only uses data from its assigned domain.
Visit `https://yourstore.com/wp-json/wc/v3/` in a browser. You should see a JSON response. If you see a 404 or a redirect, your REST API may be disabled.
Go to **WordPress Settings → Permalinks** and click **Save Changes** to flush rewrite rules — this often resolves REST API routing issues.
Some hosting providers or security plugins (like Wordfence) block outgoing webhook HTTP requests. Check your WordPress error log for delivery failures and whitelist WeezIQ's webhook endpoint in your security plugin settings.
Titles, descriptions, prices, variants, images, categories, and tags.
Discount types, amounts, restrictions, expiry dates, and usage limits.
Your WordPress pages and posts — policies, FAQ, About Us, and more.
The number of products imported depends on your current WeezIQ plan. Your plan's limit is shown on the WooCommerce Dashboard inside WeezIQ.
That's it. The WeezIQ chat widget is now live on your WooCommerce storefront. Every visitor to your store will see the chat bubble powered by your real product data, store pages, and AI knowledge base.
The widget is injected automatically into every page of your store using a small script. No theme changes or code edits are needed.
***
## What the Chatbot Can Do on Your Store
Once connected, your chatbot is a fully capable WooCommerce assistant:
Visitors can ask "Do you have winter jackets under \$100?" and the chatbot searches your synced product catalog using AI, displaying matching results as interactive **Product Cards** with images, prices, and direct links to the product page.
Customers can ask "Where is my order?" and provide their order number or email. The chatbot retrieves real-time order status, payment status, line items, and tracking information directly from your WooCommerce store.
You can enable specific coupons for chatbot distribution from your WeezIQ dashboard. When enabled, the chatbot can offer discount codes during conversations. Expired or fully-redeemed coupons are blocked automatically.
The chat widget includes a built-in **Cart Overlay** — a mini browsing experience where customers can explore recommended products without leaving the conversation.
Because your WordPress pages (returns policy, shipping info, FAQ) are synced into the Knowledge Base, the chatbot can answer detailed policy questions accurately without routing users to a different page.
***
## Plugin Settings
After connecting, you can manage a few settings directly from **WooCommerce → WeezIQ AI**:
| Setting | Description |
| ------------------ | -------------------------------------------------------------------------------------------------- |
| **Status** | Shows whether your store is connected (green ●) or not (red ●). |
| **Domain ID** | Your WeezIQ Domain ID. Auto-filled on connection. You can also paste it manually if needed. |
| **Enable Chatbot** | A toggle to show or hide the chat widget on your storefront without disconnecting the integration. |
***
## Managing Your Integration from WeezIQ
Inside your WeezIQ account, navigate to **Integration → WooCommerce** to access the full management dashboard:
Manually trigger a full resync after bulk product changes or price updates.
Cancel an in-progress sync at any time.
Remove the WooCommerce connection and all synced data from WeezIQ.
The dashboard also shows a live count of synced products, orders, coupons, pages, and reviews — alongside your plan's limit for each.
***
## Real-Time Updates
After the initial sync, WeezIQ automatically registers **webhooks** with your WooCommerce store. These webhooks push real-time updates to WeezIQ whenever:
* A product is created, updated, or deleted
* An order is placed or its status changes
* A coupon is created, modified, or removed
All webhook payloads are verified using **HMAC-SHA256 signatures** to ensure they genuinely originate from your store.
For most stores, webhooks keep your chatbot's data current automatically. However, after large bulk operations (like importing 500+ products at once), it is good practice to trigger a manual resync from the WeezIQ dashboard.
***
## Dos and Don'ts
**Keep WordPress and WooCommerce updated.** The plugin is tested up to WooCommerce 10.5 and WordPress 6.9. Outdated versions may have REST API compatibility issues.
**Write clear product descriptions.** The AI uses your product titles and descriptions to answer customer questions. The more specific and complete your descriptions, the better the chatbot performs.
**Use the Enable toggle to temporarily hide the chatbot.** If you need to take the chatbot offline for maintenance, just uncheck **Enable Chatbot** in the plugin settings — the integration stays connected and your data is preserved.
**Check your plan limits.** Review how many products are synced vs. your plan's limit from the WooCommerce Dashboard in WeezIQ.
**Test after a resync.** After updating product data, ask the chatbot product-specific questions to confirm the new information is reflected correctly.
**Don't close the WordPress tab while connecting.** The plugin polls WeezIQ every 3 seconds to detect a successful connection. If you close that tab, the auto-detection won't fire and you'll need to enter the Domain ID manually.
**Don't disconnect and reconnect repeatedly.** Disconnecting removes all synced data from WeezIQ and triggers a full re-import from scratch, which counts against your plan's sync limits.
**Don't ignore sync errors.** If the sync status shows FAILED in WeezIQ, check that your WooCommerce REST API is accessible. Some security plugins or hosting configurations block external API requests.
**Don't enable too many coupons for distribution.** Be selective about which discount codes the chatbot is allowed to share to prevent unintended discount abuse.
**Don't rely only on webhooks for bulk changes.** For large catalog updates, always follow up with a manual resync to ensure all changes are captured.
***
## Troubleshooting
The plugin polls WeezIQ every 3 seconds. If it does not detect the connection after about 30 seconds, a "Still waiting…" message appears. This usually means the authorization was not completed in the WeezIQ tab.
Go back to the WeezIQ tab and confirm the connection. If the session expired, click **Connect to WeezIQ** again to restart the process.
You can also enter your **Domain ID** manually in the settings field and save.
Verify two things in the plugin settings:
1. The **Domain ID** field is not empty.
2. The **Enable Chatbot** checkbox is checked.
Save changes and reload a page on the front end. If the widget still does not appear, check that your WordPress theme is calling `wp_footer()` — some custom themes skip this function which prevents the widget script from loading.
Check that the sync completed successfully (status shows **COMPLETED** in WeezIQ). If it shows PENDING or FAILED, trigger a manual resync.
Also verify that the WooCommerce integration in WeezIQ is linked to the correct domain — the chatbot only uses data from its assigned domain.
Visit `https://yourstore.com/wp-json/wc/v3/` in a browser. You should see a JSON response. If you see a 404 or a redirect, your REST API may be disabled.
Go to **WordPress Settings → Permalinks** and click **Save Changes** to flush rewrite rules — this often resolves REST API routing issues.
Some hosting providers or security plugins (like Wordfence) block outgoing webhook HTTP requests. Check your WordPress error log for delivery failures and whitelist WeezIQ's webhook endpoint in your security plugin settings.